Payments
Find queries and solutions related to your member’s payments and transactions.
Transactions
See all the transactions and payment details about the selected member in this section.
In Payments > Transactions section, you get a detailed report of the member’s transaction history related to the club and its services – Invoice number, Category, Payment Method, Date, Total Amount, etc.
To access the member’s Transactions page/section, navigate through Organizations > Members > Actions > Payments > Transactions.

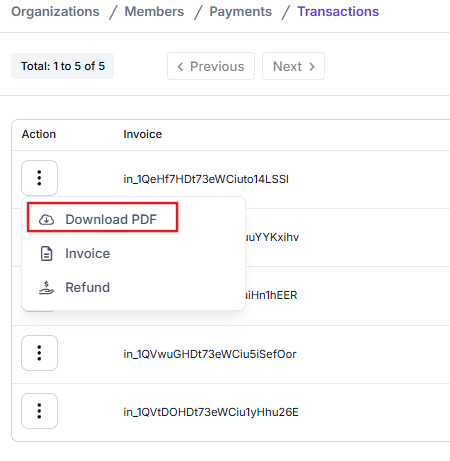
Download Transaction Invoice
An invoice is generated for each transaction the member makes. This invoice contains the details of the transaction, invoice number, date of transaction, total amount, etc.
To download a member’s invoice, navigate through Organizations > Members > Actions > Payments > Transactions:
-
Navigate to the member’s transaction you want to get the invoice for, click on the three vertical dots (⋮) from the Action column of the selected transaction.
-
Click on Download PDF to download the invoice to your device/PC. Once clicked, the download will begin automatically.
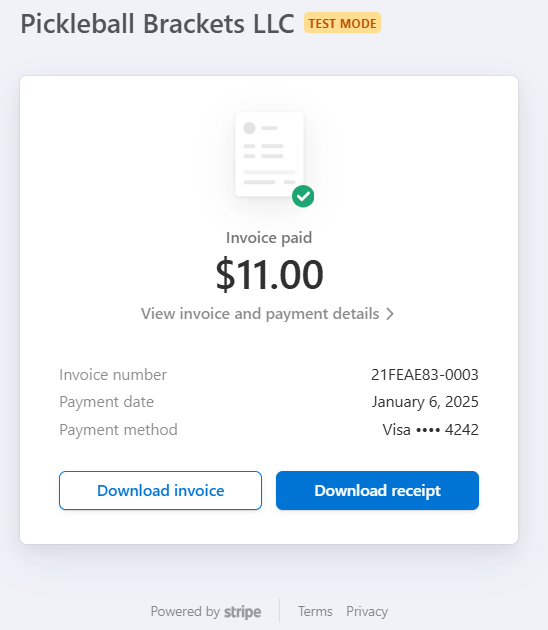
Download Transaction Receipt
Each transaction the member makes generates a receipt which has the details of the transactions, invoice number, payment method, date of payment, total amount, etc.
To get a transaction’s receipt, navigate through Organizations > Members > Actions > Payments > Transactions:
-
Navigate to the member’s transaction you want to get the receipt for, click on the three vertical dots (⋮) from the Action column of the selected transaction.
-
Click on Invoice option, it’ll navigate you to a new page where you can see the transaction’s receipt.
-
In the receipt’s page you’ll get multiple options – Download Receipt, Download Invoice, View Invoice and Payment Details -
-
Download Receipt – click on this option/button to download the transaction’s receipt. If clicked, the receipt will then be downloaded to your device.
-
Download Invoice – click on this option/button to download the transaction’s invoice. If clicked, the invoice will then be downloaded to your device.
-
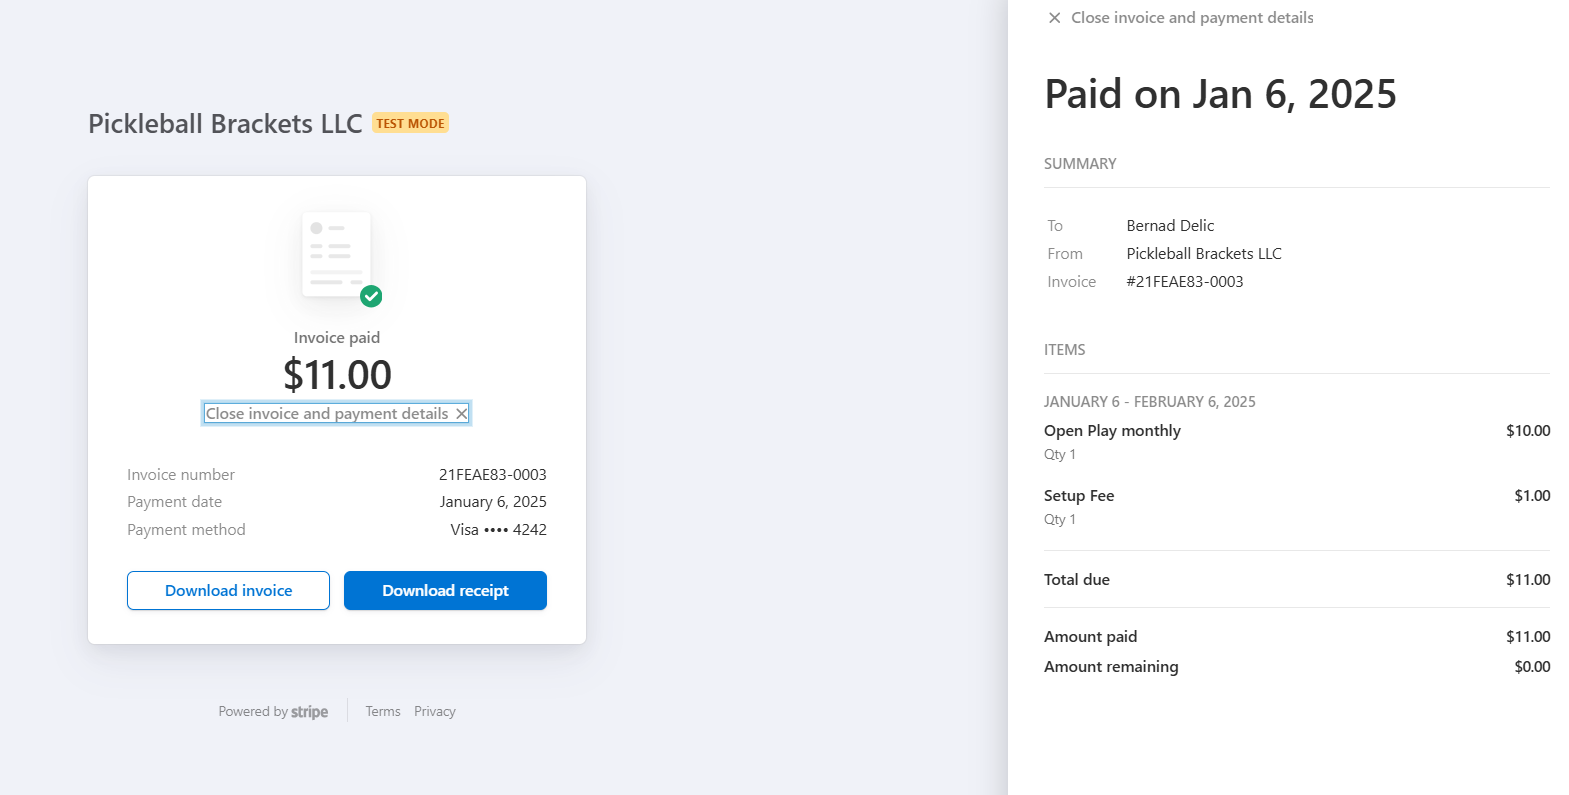
Invoice and Payment Details – click on this option to see the details of the transaction/payment. It’ll have a detailed transaction report. If you are not satisfied with the receipt, charges, you can use the Contact Pickleball Brackets LLC from the Invoice and Payment Details section to talk to the customer support/company itself. You can mail them your queries on their email address or contact them on their phone number.
-
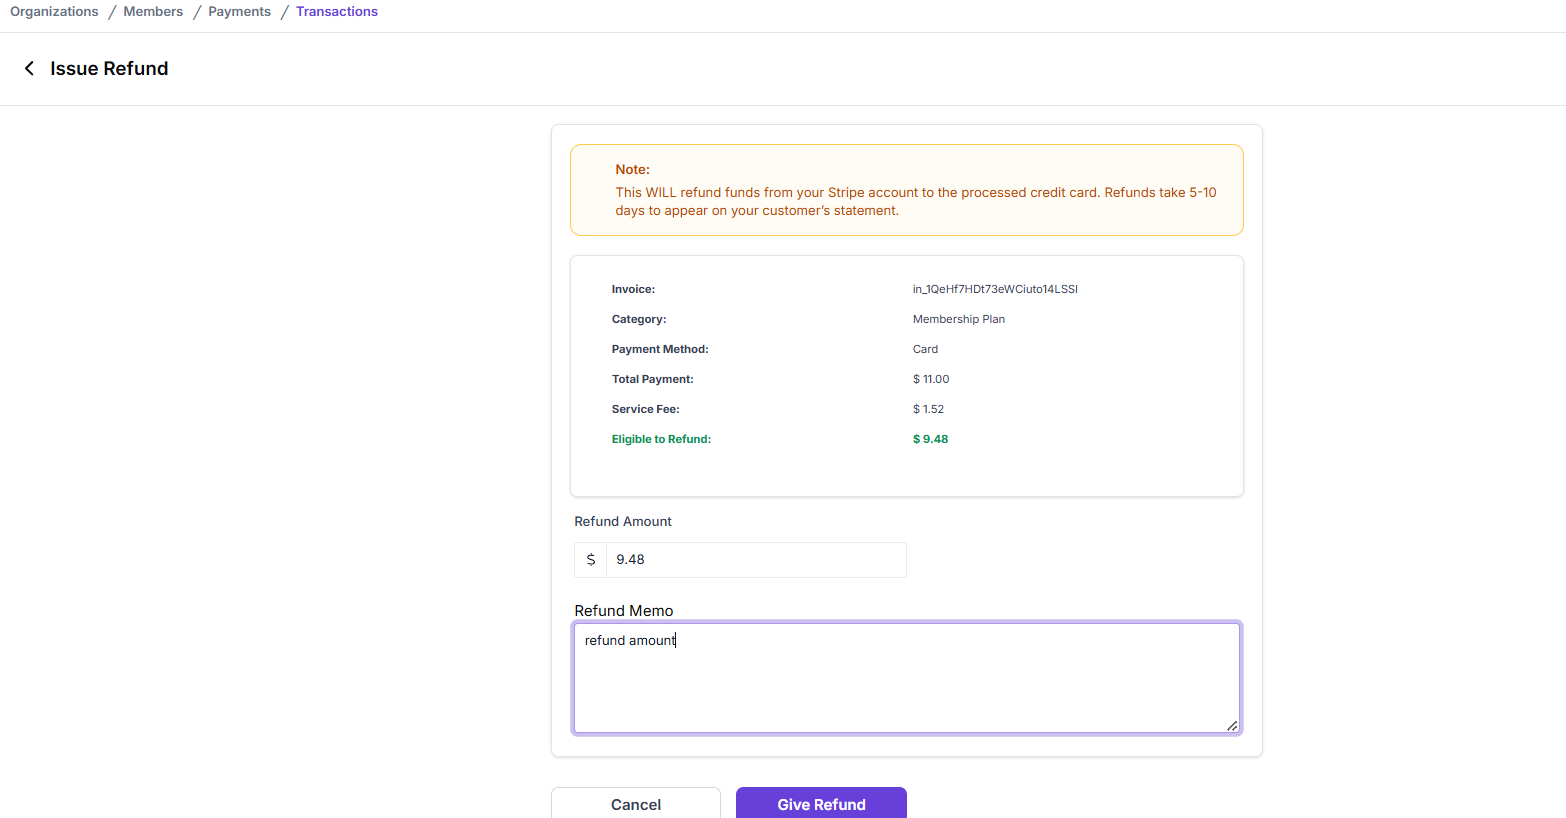
Refund Transaction Amount to the Club Member
In case of payment disparity or discrepancy, you can refund the payment amount back to the member/user. The Refund option can be accessed from the Payments > Transactions page.
To refund a payment amount back to the member, navigate through Organizations > Members > Actions > Payments > Transactions:
-
Navigate to the member’s transaction you want to issue a refund for, click on the three vertical dots (⋮) from the Action column of the selected transaction.
-
Click on the Refund option, it’ll navigate you to the – Issue Refund page.
-
In the Issue Refund page, you get the details of the payment made by the user.
-
If you want to refund the entire amount, you’ll see it in the Eligible to Refund section. The refund amount calculated automatically; it subtracts the Service Fee from the Total Amount paid by the user.
-
If you are satisfied with the calculated amount, enter the Eligible to Refund amount in the Refund Amount area. (Note: The amount to refund must be less or equal than the Eligible to Refund amount!)
-
Write refund note in the Refund Memo area, click on Give Refund to initiate the refund process. (clicking the Cancel button in this page will cancel the Refund process).
-
Once you click on the Issue Refund button, you’ll get a Refund Invoice pop-up window with details of the Refund.
-
Click on Issue Refund to initiate the refund process. (Else, click on the Cancel button to cancel the refund). On successful Refund Initiation, you’ll get a success message about the amount refunded back to the user.
-
The issued refund amount will now appear in the Transactions page.
-
When a refund is issued, it’ll refund the funds from your Stripe account to the processed credit card.
-
Refunds usually take 5-10 business days to reflect in customer’s statements.
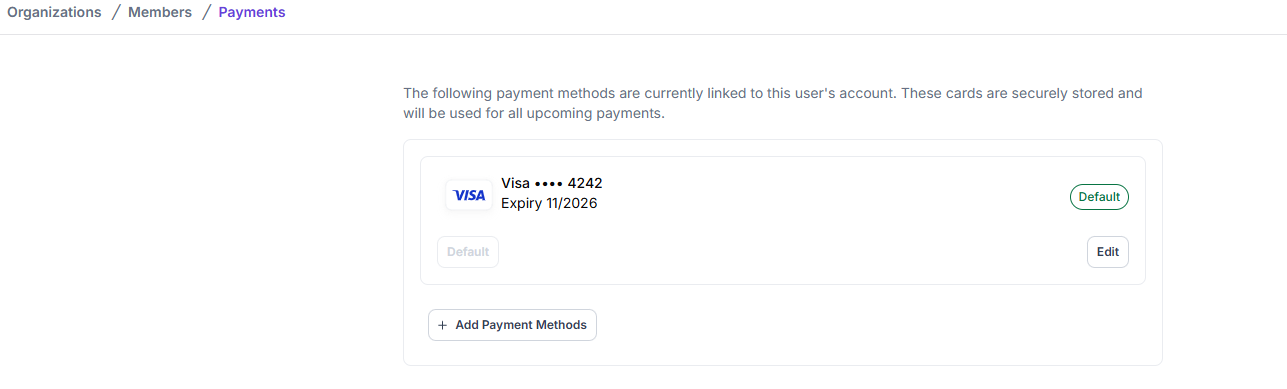
Methods
Methods shows you all the payment methods currently linked to the user’s account – Card, ACH, etc. These payment details are securely stored and are used for all of user’s upcoming payments.
In Payments > Methods page, you get the payment modes added by the user to access the club and/or its services.
If user has more than one payment methods linked to their account, the default (active payment method) payment method will be marked as default.
To access the member’s Transactions page/section, navigate through Organizations > Members > Actions > Payments > Transactions.
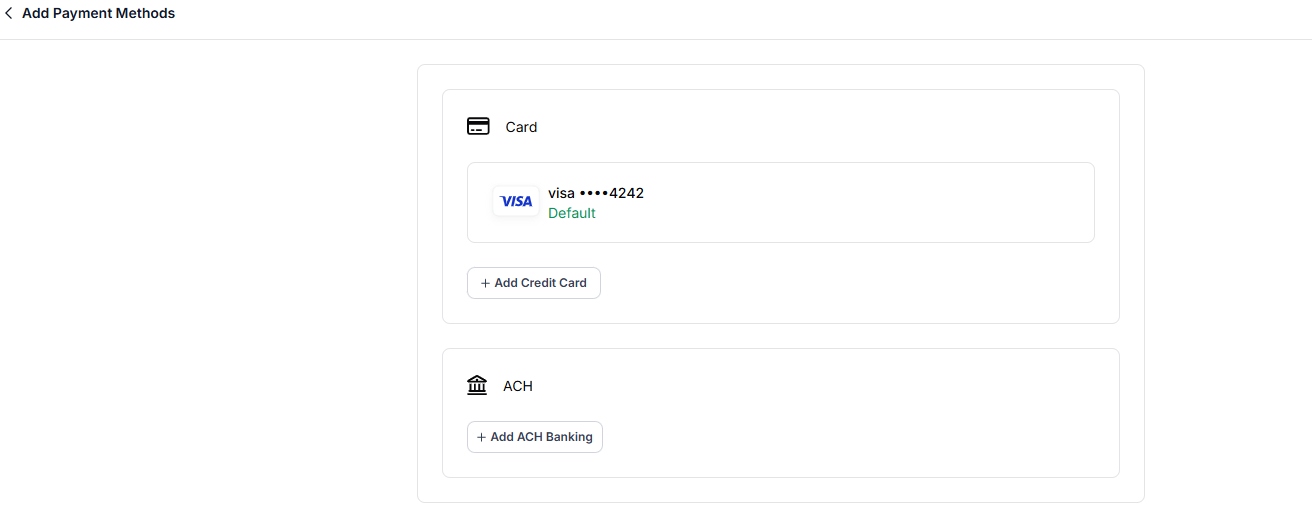
Add a New Payment Method for User
Payment methods are how your user makes their payments for their membership to the club. These payment methods can be – Card (Credit Card) or ACH (ACH Banking).
The user’s payment methods can be accessed from the Payments > Methods page.
To add a payment method for the user, navigate through Organizations > Members > Actions > Payments > Methods:
-
Click on the +Add Payment Methods, it’ll open a new page where you have the option to add a payment method – Add Credit Card, Add ACH Banking.
-
Add Credit Card – Here’s how you add a credit card as a payment method –
-
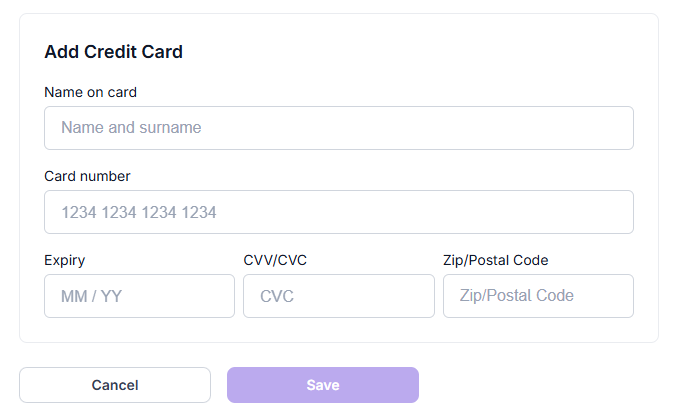
To add a credit card as user’s payment method, click on the +Add Credit Card in the Card section.
-
Fill in the user’s card details in the Add Credit Card section – Name on Card, Card Number, Expiry, CVV/CVC, Zip/Postal code, and click on Save to save the card for future transactions.
-
On successful addition of the card, you’ll get a success message about it. The new changes will be reflected in the user’s Payments > Methods page.
-
-
Add ACH Banking – Here’s how you add an ACH Banking account as a payment method –
-
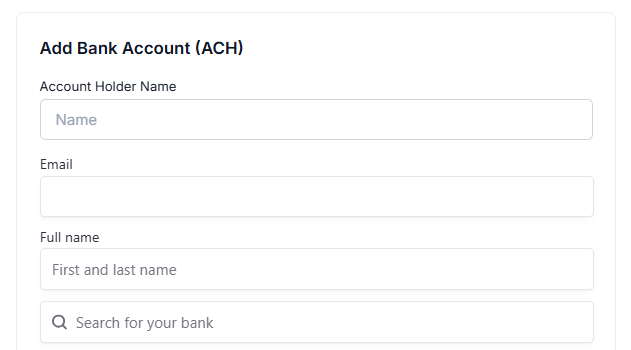
To add an ACH Banking account as user’s payment method, click on the +Add ACH Banking in the ACH section.
-
Fill in the user’s ACH Banking details in the Add Bank Account (ACH) section – Account Holder Name, Email, Full Name, Bank’s Name (select from the given options or search in the Search bar).
-
Once the Bank Name is added, you’ll get a pop-up prompting you to Agree to the Terms and Conditions and log in with the user’s bank details. Click on Agree and Continue to connect the ACH payment mode.
-
After successful addition of ACH payment mode, click on Back to Pickleball Brackets LLC to return back to Payment Methods page. The ACH bank account is added as a payment method but not saved.
-
Click on Save to finally save the user’s ACH Banking details. On successful addition of the ACH Banking, you’ll get a success message about it. The new changes will be reflected in the user’s Payments > Methods page.
-
Edit Added Credit Card Details
In case the user’s card details as a payment method is incorrect, you can make changes to it without having to go through adding a new credit card as a payment method.
The edit option can be accessed from the Payments > Methods page.
To edit a user’s credit card details, navigate through Organizations > Members > Actions > Payments > Methods:
-
Choose the credit card you want to edit form the linked cards (in case there’re more than 1 card linked to the user's account). Click on Edit, it’ll take you to a new page.
-
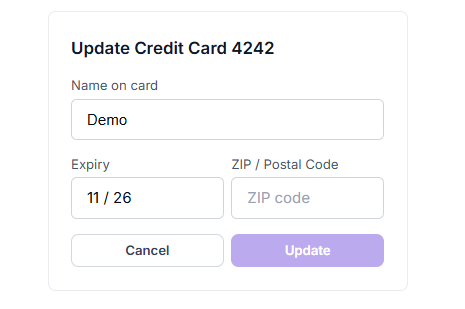
Edit the selected credit card details – Name on Card, Expiry, ZIP/Postal Code.
-
Click on Update to save the edited details. On successful update of the credit card details, you’ll get a success message about it. The new changes will be reflected in the user’s Payments Methods page.
- You can only edit Name on Card, Expiry, ZIP/Postal Code details of user’s credit card, not the Credit Card Number, CVC/CVV. To edit out those details, you’ll have to Add a new Credit Card for the user. See – Add Credit Card for more details.
Set Default Credit Card for Payments
A default payment method is user’s active payment method. It lets the user make payments for any club-related transactions without selecting a payment method when making a payment.
To set a payment method as default, navigate through Organizations > Members > Actions > Payments > Methods:
-
Navigate through user’s payment methods if they have more than one payment methods added to their account.
-
Click on Set as Default button on the payment method you want to set as the default payment option.
-
Once done, a default tag will appear in the set payment method, setting it up as the default payment method.

In case user has only one added payment method, it will be set as their default payment method automatically.
Delete a Payment Method
In case a payment method is wrong, expired, etc. you have the option to delete it completely from the user’s account.
To delete a user’s payment method, navigate through Organizations > Members > Actions > Payments > Methods:
- Navigate through user’s payment methods if they have more than one payment methods added to their account.
- Click on the Delete button (bin icon) on the payment method you want to delete. Once clicked, you’ll get a pop-up screen asking for delete confirmation on the selected payment method. (Note: This action cannot be undone. Delete only when you are sure it won’t affect user’s transaction experience).
- Click on Remove button to confirm the payment method deletion. Once done, the selected payment method will be deleted from the user’s payment method screen.
Deleting a payment method is an irrevocable action. Do this only when you’re sure it won’t affect the user’s experience. In case you want to add another payment method, see - Add Payment Method.
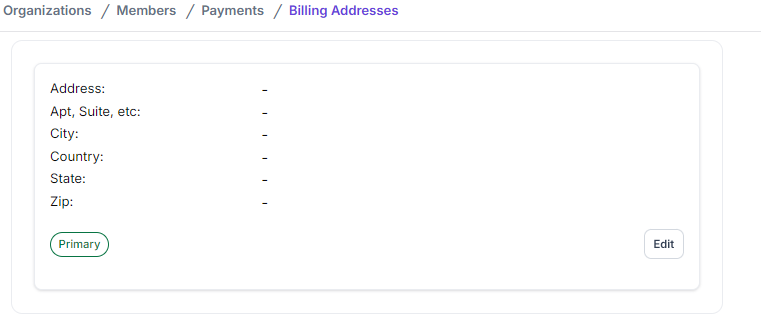
Billing Addresses
Billing address shows you all the billing addresses currently saved by the user to their account. These addresses are used for all of user’s transaction-related and other details.
If user has more than one billing addresses saved to their account, the primary (active billing address) address will be marked as Primary.
Edit User’s Billing Address
If there’s any discrepancy with the user’s billing address, you can make those changes from the Billing Addresses page.
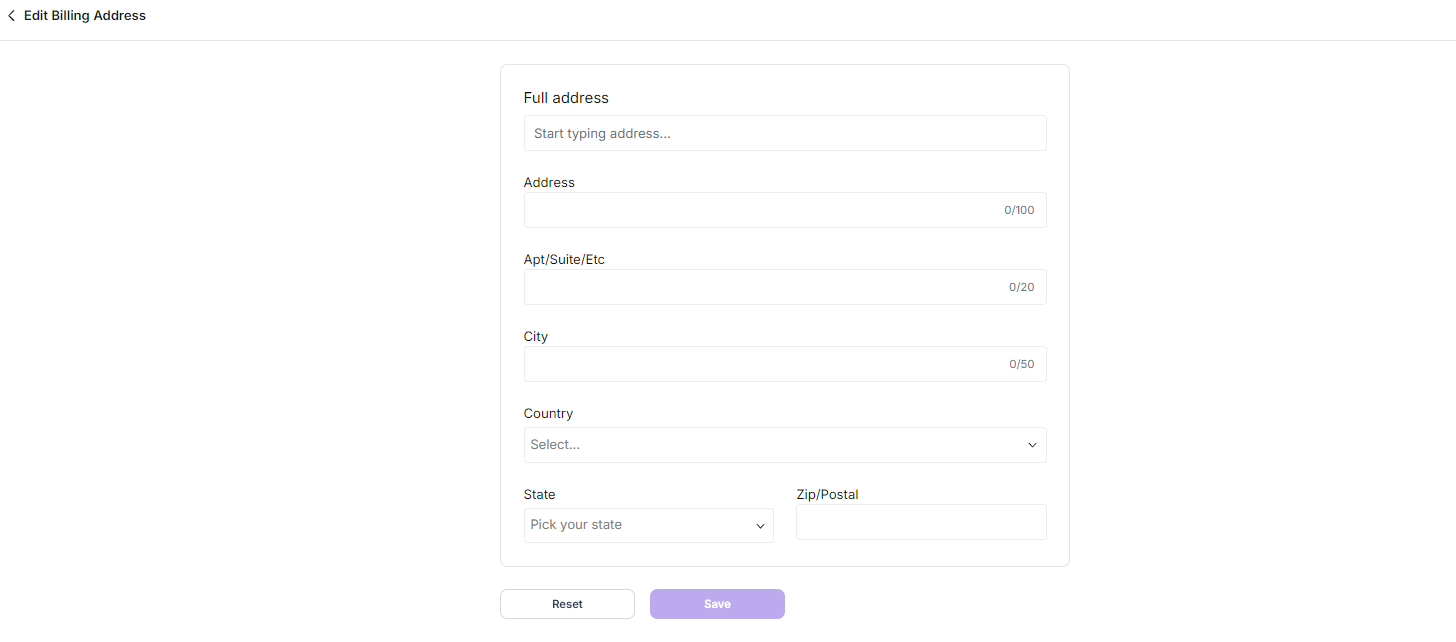
To access and edit user’s billing addresses page/section, navigate through Organizations > Members > Actions > Payments > Billing Addresses:
-
Click on the Edit button on the address that you want to edit, it’ll open a new page where you have the option to edit the user’s billing address as required.
-
The areas you can make changes to are – Full Address, Address, Apt/Suite, City, Country, State, Zip/Postal, etc.
-
Click on the Save button once the required changes are made. On successful billing address update, you’ll get a success message about it. The new changes will be reflected in the user’s Payments > Billing Addresses page.