Affiliations
The Affiliations page presents a variety of options for users to make necessary adjustments according to their preferences. The available options are as follows:
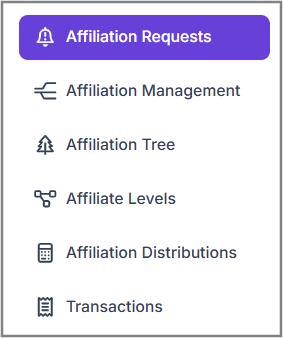
Affiliation Requests
This window displays a total of five levels of affiliation requests.
The user can view both types of affiliation requests here, along with the organization's name and the current request status. It also shows the date when the affiliation request was made and its previous status. The affiliation requests are categorized as follows:
- Pending: Requests that are yet to be processed or completed by the user.
- Declined: Requests that have been rejected.
Affiliation Management
The Affiliation Management module provides tools for managing different levels of affiliations and their associated cost settings.
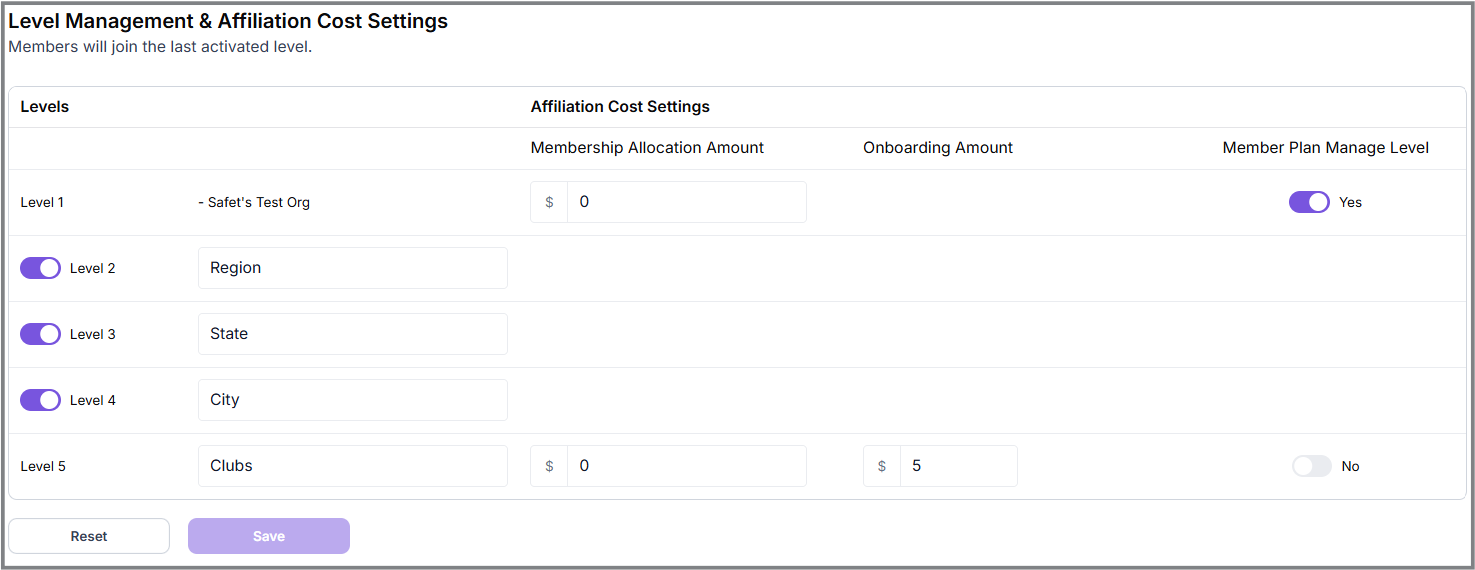
These levels represent various types of authority or hierarchy with which a club can be affiliated, such as a city, state, region, or an organization. It is not mandatory for a club to be associated with every level; a club may choose to affiliate with one or multiple levels based on its preferences or requirements.
Levels
The levels represented are as follows:
- Level 1 - United Pickleball Organization (Safet's Test Org)
- Level 2 - Region
- Level 3 - State
- Level 4 - City
- Level 5 - Club
Affiliation Cost Settings
Step 1: Identify Levels Requiring Amount
Determine which levels need an amount to be specified for membership allocation. The Amount is required only for Level 1 and Level 5.
Step 2: Decide Membership Allocation Criteria
Criteria can include skill level, age group, or specific interests.
Step 3: Create Teams Based on Levels
Organize members into teams based on their levels and interests.
Example: Youth, Amateur, and Professional teams with distinct membership rules.
Membership Allocation Amount
This fee applies to members affiliated with either the Club at Level 5 or the United Pickleball Association at Level 1.
Onboarding Amount
The onboarding fee applies exclusively to Level 5 Clubs. This fee is charged when a Club affiliates itself with a certain level.
Member Plan Manage Level
The radio button is available only for Level 1 and Level 5 affiliations. It can be activated for either Level 1 or Level 5, but not both simultaneously. If the radio button is turned on for Level 1, it will automatically turn off for Level 5, and vice versa.
Affiliation Tree
The User's Organization is permitted to affiliate with other organizations.
- The user can access an overview of affiliated organizations across different levels.
- This overview allows the user to identify which Club/Organization is affiliated with which group/level.
- Additionally, the user can determine whether a Club/Organization is associated with a single level or multiple levels.
Here is an illustration of how an affiliation works across different levels:
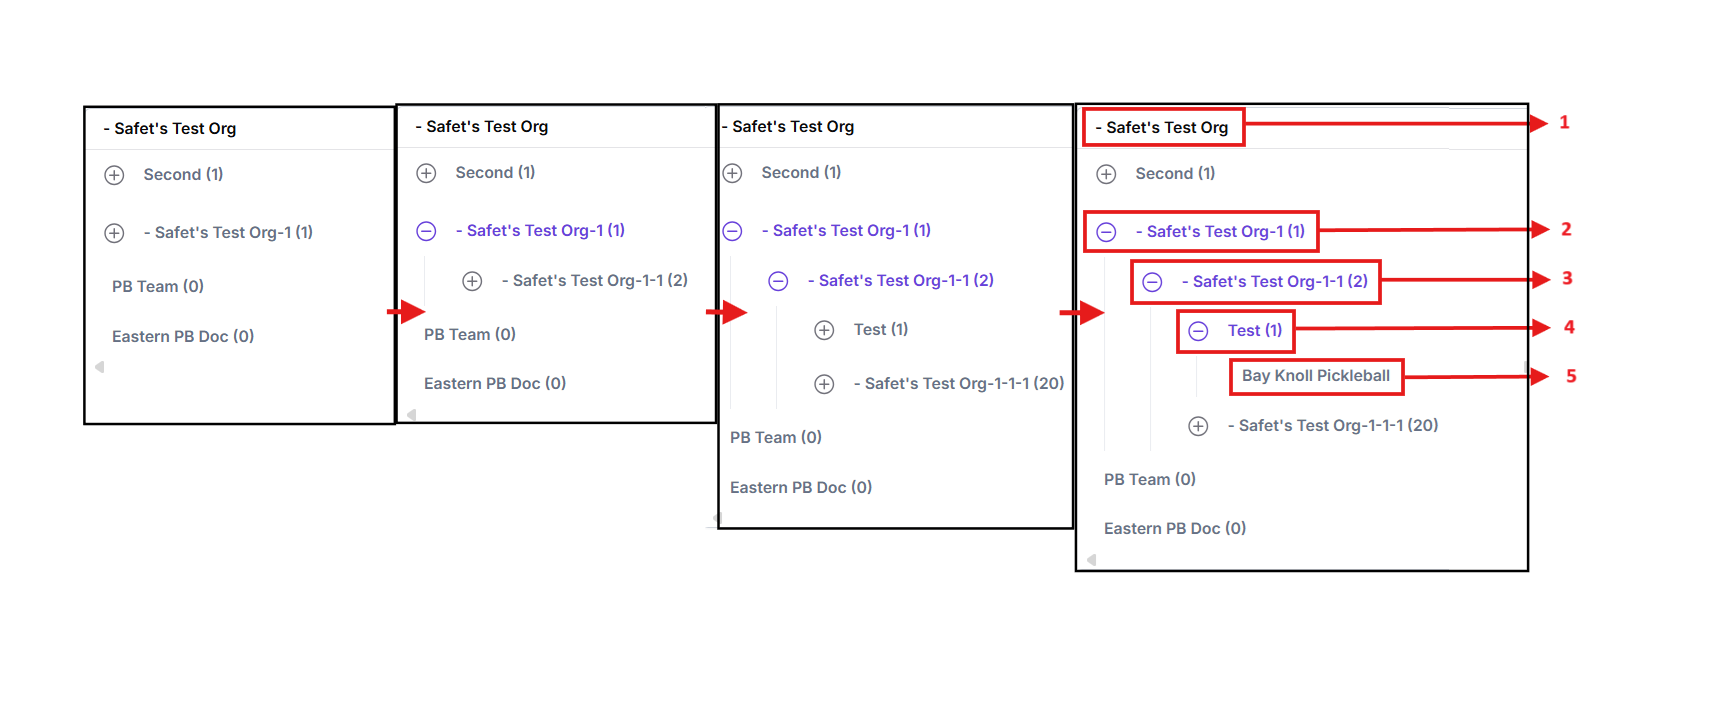
- Safet's-Test-Org: Represented by the 'United Pickleball Association', which controls the entire affiliation process.
- Safet's-Test-Org-1(1): Represents the 'Region' that the organization is affiliated with.
- Safet's-Test-Org-1-1(2): Represents the 'State' within a country. If the organization is affiliated with any region, it will be shown on the screen.
- Test (1): Represents a 'City' within a country that the organization is in.
- Bay Knoll Pickleball: Displayed after clicking the affiliated city. This shows the affiliated Club/Organization.
If the user wishes to edit an organization’s affiliation details, they can click on the Club/Organization’s name. This action will redirect the user to another page where they will have the option to edit and save any changes in the affiliation's options.
- If the user requires the entire dataset, they can click the “Export” option at the top right corner of the screen. Upon selecting this option, the 'Affiliations Tree' will be automatically downloaded.
Affiliate Levels
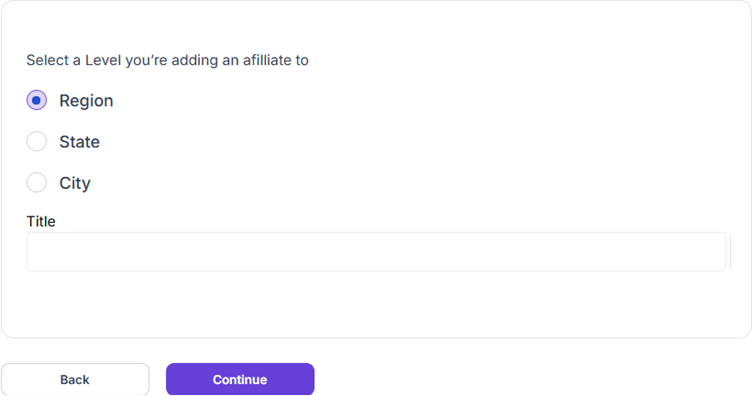
The User can click the ”Add New Affiliate” option in this window to add a new affiliation. This will allow the user to customize his affiliation.
![]()
The User can view three options to create affiliations at three different levels.
- Region
- State
- City
1- Region: This is the topmost affiliation level a user can choose. After selecting the “Region” button, the user needs to:
- Enter the Title of the affiliate.
- Once the title is entered, click the “Continue” button to save their progress.
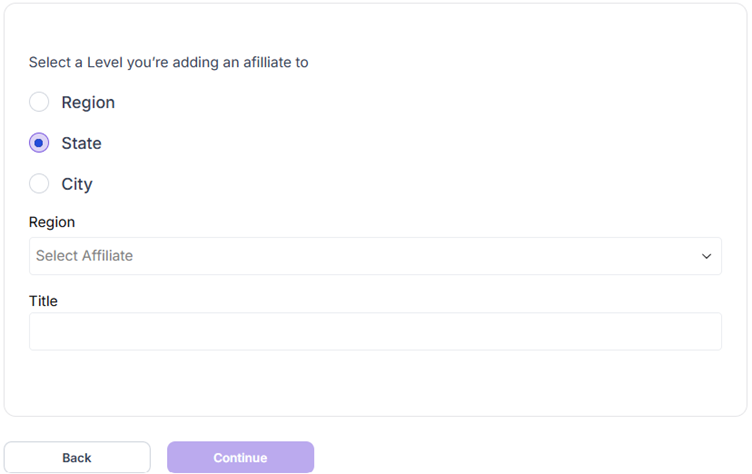
2- State: If the user needs to have affiliations at the state level:
-
Mention the Region to which the State needs to be affiliated.
-
Enter the Title of the state-level affiliation to progress.
-
After providing all the details, click the “Continue” button to save the progress.
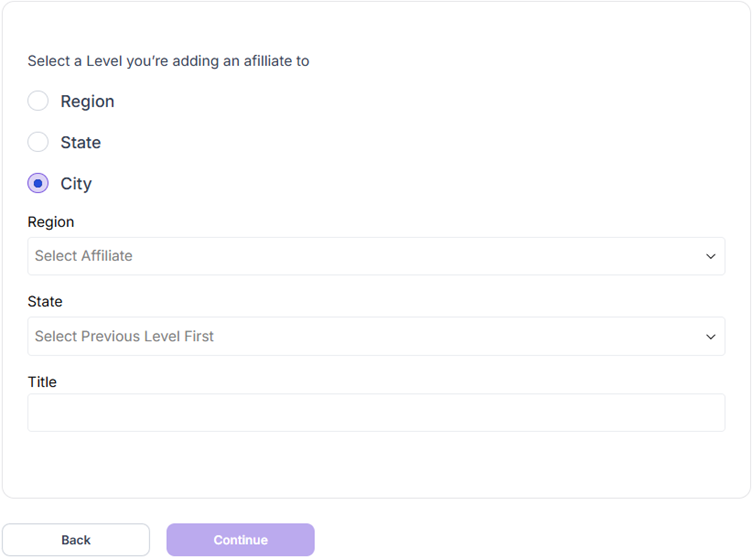
3- City: For city-level affiliation, the user must:
-
Select the Region first.
-
Select the State with which the City needs to be affiliated.
-
Mention the Title of the affiliated City.
-
Click the “Continue” button to save the progress.
Once the affiliations are created, users can view all the created affiliations from the Affiliate Levels homepage. To make any changes to the affiliations, the User must:
- Click the “Actions” option beside the logo of the affiliation.
- Then click the “Edit” option to modify the desired details.
Edit Affiliate
It contains a series of options where the user will see and edit the details of the affiliated organizations.
Info
The Info section has all the organization details the user needs to fill in. It covers the basic and contact info, which can be accessed by back-end users.
Basic Info
The following details outline the localization settings that help back-end users consistently display the correct date and time. These settings are crucial for ensuring accurate information based on the club's location.
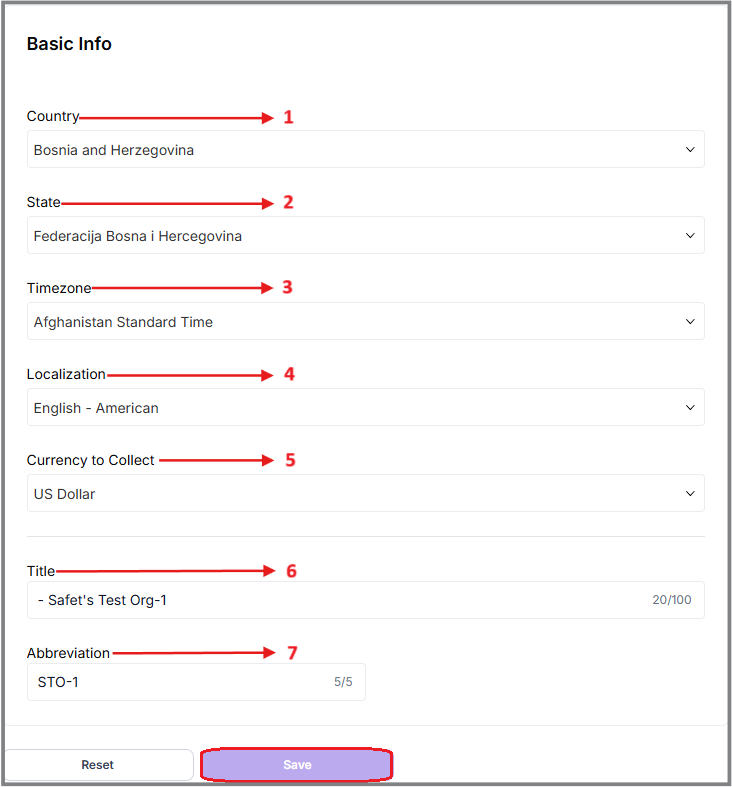
- Country- The user must specify their country name, which will be integrated into the organization's information.
- State- The user needs to select their state from the dropdown list by searching for the appropriate option.
- Time Zone- This refers to the time zone followed by the user. The user must specify the standard time zone for their location.
- Localization- This setting allows users to display their preferred local language.
- Currency to Collect- The currency to collect refers to the type of money back-end users will receive for payments. This ensures clear and consistent transactions.
For example, if payments are collected in USD and a customer pays in CAD, the system automatically manages the conversion. This feature helps back-end users track the currency collected and identify the customer's payment currency based on their credit card.
- Title- This displays the title or name of the organization.
- Abbreviation- The abbreviation represents a short form of the organization's title, such as an acronym (e.g., NFL or NBA).
Once transactions are made, this setting cannot be changed.
3.1.1.4 Contact Info.
Each club or organization must provide their contact details, including a primary contact and, optionally, a secondary contact. The back-end team will use these contacts exclusively for club-related communications. This information will remain private and will be used solely by the developer team to communicate with the club.
To add a primary contact the user must click the "Add Contact" option.

After clicking it, the user will be redirected to a window, where he has to choose his desired contact person as a Primary contact from the search bar.

The below figure indicates that the primary contact is already set up.
To add a secondary contact, the user needs to follow the same procedure as the Primary contact.
In this tab, the User has to click on the ‘Add Contact’ option to add a new contact.
![]()
When a new option appears on the screen, the user will be able to search for a new contact.
From this tab, the user can type in a name to add to their contacts. As they type, a list of matching names will show up automatically. If they want to narrow it down further, they just need to enter the full name, and it'll filter out the other entries.
By clicking the “Add” button, the contact will be added as their preferred contact automatically.
Contact Form Emails
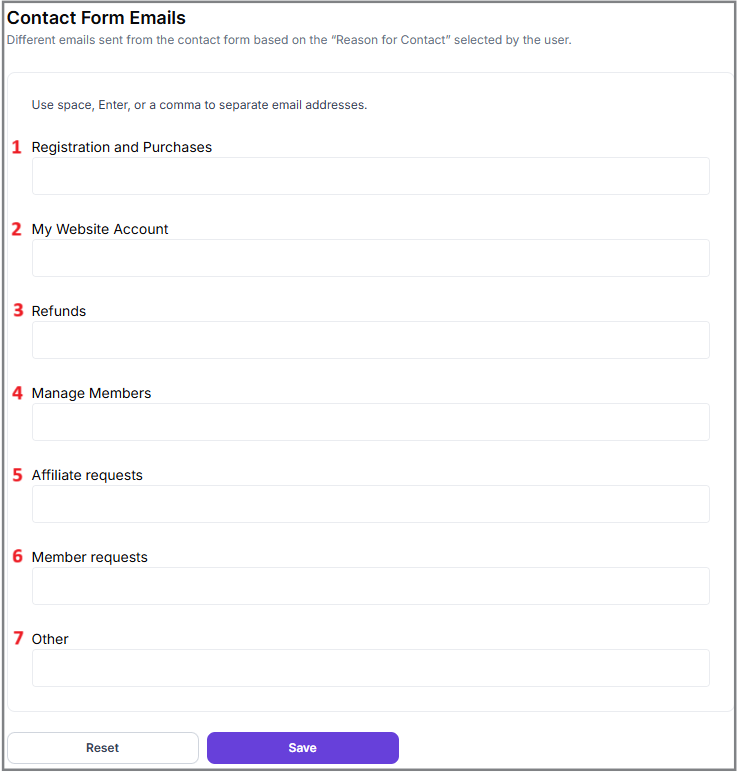
When the user fills out the 'Contact Form Emails' option, there are several fields they need to complete, such as:
1. Registration and Purchases - For queries related to new registrations or purchases made through our platform.
2. My Website Account - For issues or questions about the user's account on the website.
3. Refunds - For requesting refunds on purchases.
4. Manage Members - For administration and management of member accounts.
5. Affiliate Requests - For inquiries or requests from affiliates.
6. Member Requests - For specific requests from existing members.
7. Other - For any other inquiries not covered by the above categories.
By Clicking the ”Save” button the User will be able to save the progress.
Description
Here, the user can provide a brief description of their club, detailing all the features and services they offer.
Additional Info
Additional information can also be provided, mentioning events, discounts, various merchandise, and many other offers that the user's organization provides.
Logo & Files
Organization Logo
The organization's logo helps users be recognized and have their own identity. It also plays an important role in branding, marketing, and as a symbol of pride for members and participants.
Full Logo
Here, the user can upload the full logo, which will appear on the website when they search for or click on a club. On this page, the logo can be seen at the actual size that the public will view it.
There are certain dimensions within which the user has to select his logo files. Like it is shown in the picture, the dimensions should be 800 x 400 px.
![]()
The user must follow one of the following steps to Upload the Logo:
- Drag and Drop:
- The user can drag and drop the image file (SVG, PNG, or JPG) onto the designated box shown in the figure.
- Click to Upload:
- The user can click the "Click to Upload" icon.
- Browse and select the image file from their system.
- Upload the selected file.
After the user uploads the logo, this is its display size for the public.
Abbreviated Logo
There is also an abbreviated logo or icon logo, which is designed for areas where a smaller version of the user's logo is displayed on the screen. The actual size of the abbreviated logo can be seen in the figure below.
![]()
The dimensions of the Abbreviated logo must be 55 x 55 px.
The uploading process for the abbreviated logo is the same as for the full logo. The user just needs to remember the size and dimensions of the logo.
Waiver
Waivers are managed in this section. The user can upload and organize various types of waivers, such as child waivers, membership waivers, booking waivers for reservations (like court rentals or ball machines), program waivers, and facility waivers.
If the user needs to disable a membership waiver and upload a new version, he can do that easily by clicking the “Disable” button in the Waiver section.
There's no limit on the number of waivers the user can upload, and easily replace existing ones.
Users can add multiple types of waivers to their organization. To add a new waiver type, the user can simply click on the "Add New Waiver" option.

After clicking the 'Add New Waiver' option, the user will see a window where they need to specify their waiver details, including the Waiver Type and Title, for better clarity.
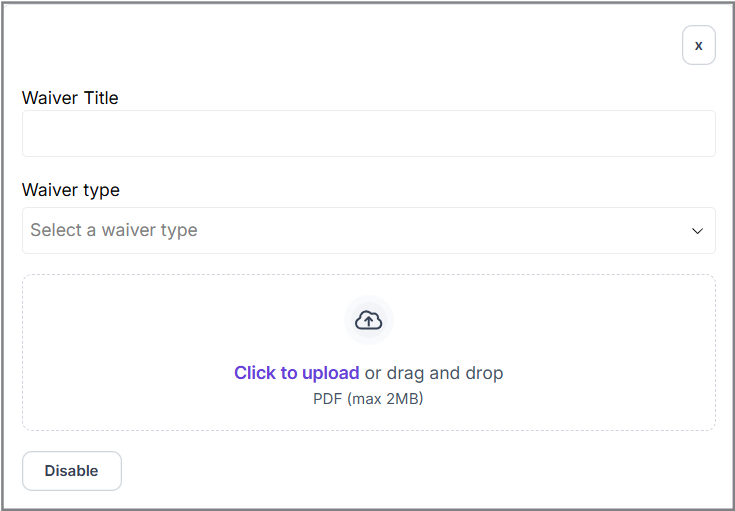
Waiver Title
The User can name the title of his waiver and then select what kind of waiver he is going to associate it with.
Waiver Type
Under this category, the user can see a dropdown list under the name ‘Waiver Type”, where he can find different types of waivers, such as:
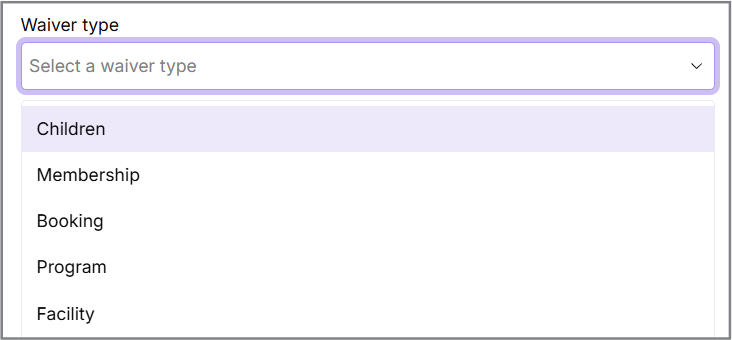
- Children
- Membership
- Booking
- Program
- Facility
1. Children
These are those legal documents that parents or guardians sign on behalf of their child before the child participates in a sports activity. These waivers typically release the sports organization from liability in case the child gets injured during the activity.
2. Membership
Membership waivers are legal documents that participants sign when they join a sports club or organization. These waivers typically release the organization from liability in case of injuries or damages that occur during participation.
3. Booking
Booking waivers are legal documents that participants sign when they book a spot in a sports event, class, or activity. These waivers typically release the event organizers from liability in case of injuries or damages that occur during the activity.
4. Program
Program Waivers are those kinds of legal documents that participants sign to acknowledge and accept the risks associated with a particular activity or program.
5. Facility
Facility waivers also hold the same kind of documents that notifies the users to be aware of all the risks involved within the facility.
After selecting the user's choice of type of waiver, the user can upload the files that contain all the relevant terms and conditions for that waiver type.
Upload Waiver
To upload the files, the user can simply click on the “Click to Upload” button on the screen and browse it from his system files or, he can simply drag the files from his system folder.
After completing all the details, the user can see that the waiver has been created, with the time and date of uploaded files included. By clicking the 'View Waiver' option, the user can view an overview of their uploaded waiver, and the file will automatically download to their system.
Discount Codes
Users can create discount codes for various purposes within the product. By clicking on the discount codes option, they can manage all their codes in one place.
Once a discount code has been used, it cannot be deleted. Inactive codes can be viewed, disabled, edited, or deleted.
1. Add New Discount Code:
To start the process, the user should click on the "Add New Discount Code" option.
![]()
This will open a new window or form where they can enter the necessary details for the discount code.
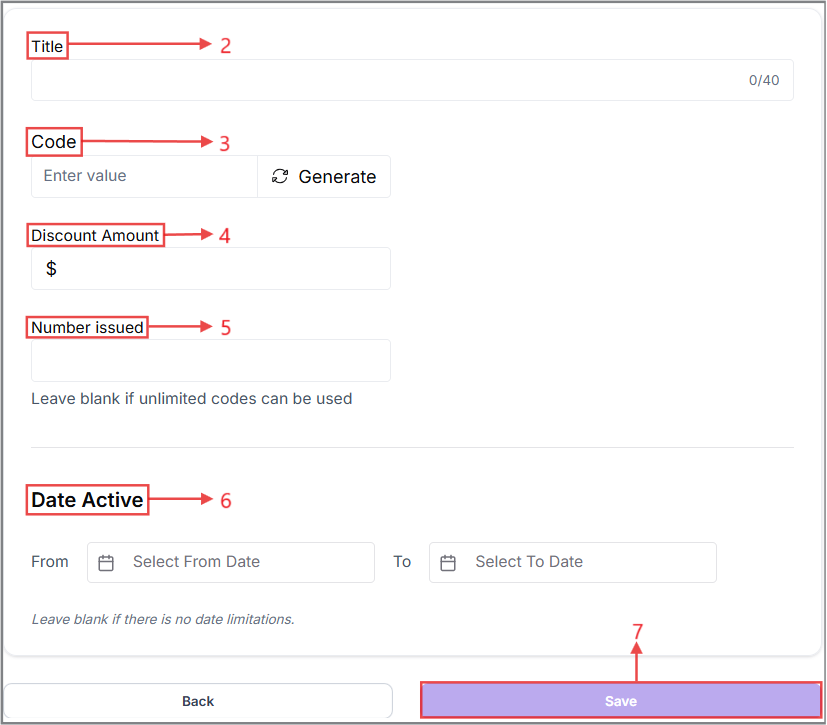
2. Title:
The user needs to enter a title for the discount code. This title will help in identifying and managing the code within the system.
3. Code:
The user has two options for the discount code itself:
- They can click on the “Generate” option, which will automatically create a unique code.
- Alternatively, the user can manually input their own custom code if they have a specific one in mind.
4. Discount Amount:
The user should specify the amount or percentage that represents the value of the discount. This defines how much the discount will be worth when applied.
5. Number Issued:
The user can define how many times the discount code can be used. This is useful for limiting the availability of the discount to a certain number of uses. If the user leaves this field blank, the code will have unlimited uses.
6. Date Active:
When creating a discount code, users can define its active period by specifying a start and end date (e.g., from January 1st to January 10th). During this time, the code can be used to avail the discount.
The behavior of the discount code depends on the specified activation date:
-
If the user indicates that the discount code will activate from a previous date or the current date and time, it will immediately appear in the “Active” section.
-
If the user sets the activation date for the upcoming days, the discount code will be listed in the “Inactive” section on the Discount Codes homepage. The code will become active once the specified date and time are reached and will turn “Inactive” after the designated time has passed.
7. Click on “Save”.
After saving the progress, the user can see a summary of the entries that the user had made earlier.
These above steps ensure that the discount code is set up with all necessary details and can be effectively managed and utilized.
There are also other options regarding the generated discount code that the user will see after clicking the three dots. These options include:
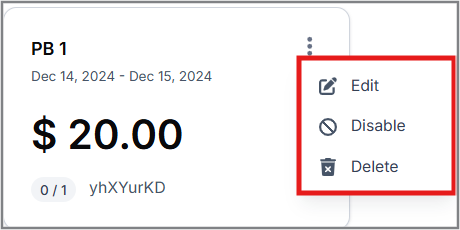
-
Edit- This option allows the user to edit all the details of the discount codes if he wishes to.
-
Disable- This option disables the ongoing plan created by the user. Additionally, the user can disable an inactive plan from the inactive section or enable a previously disabled plan from the same section.
-
Delete- By clicking this option, the user will completely delete any discount codes that have been created.
Sponsors
Adding a Sponsor:
To add a sponsor, the user needs to click the "Add New Sponsor" option.
![]()
Fill in Sponsor Details:
A new window will appear where the user must enter all necessary details about the new sponsor.
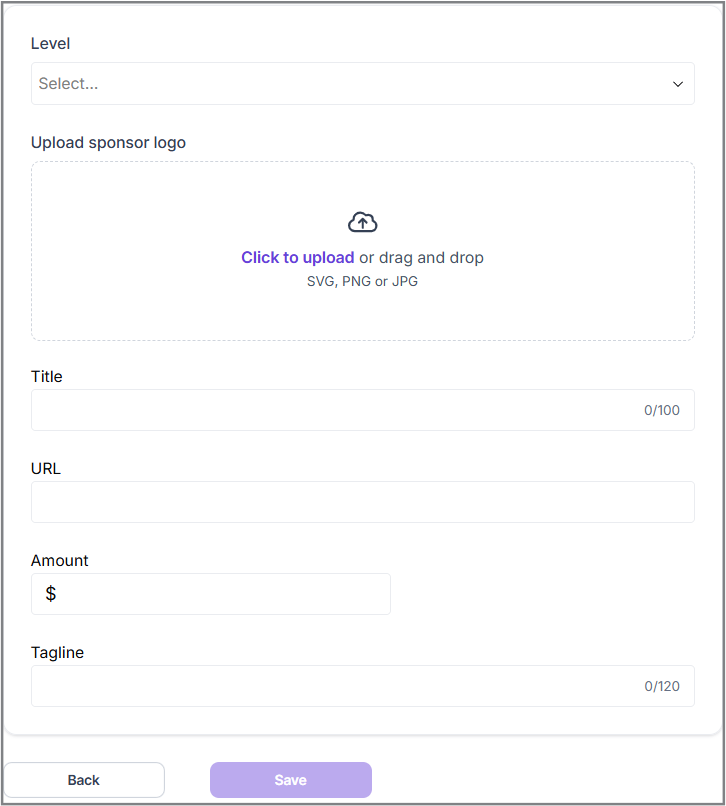
1. Level- Sponsors can have multiple levels, such as Gold, Silver, Platinum, Bronze, Partner, etc. These levels grant certain privileges based on their status.
2. Upload Sponsor Logo- The user will need to upload the sponsor's logo by clicking the "Click to upload" option. The user can browse their system for the logo files or drag and drop the logo image into the designated space.
![]()
3. Modify the Logo- The system will redirect the user to another window, allowing them to adjust the logo as needed. After making the changes, the user should click the "Done" button in the top-right corner of the page.
![]()
The above figure does not represent the actual size of the full page. It has been modified and reshaped for the user's convenience.
4. Title- The user must provide the name/title of the sponsor.
5. URL- URLs can include components like paths, queries, and fragments to direct users to specific content within a site.
6. Amount- The sponsorship amount will be displayed on the Sponsor's homepage once all details are completed. Therefore, the user must include the sponsorship amount along with other details.
7. Tagline- The user can also include the sponsor's value and tagline (e.g., Nike's "Just Do It").
Once all information is uploaded, the Sponsors Page homepage will display the sponsor details as shown below. If the user adds multiple sponsors, each sponsor will be displayed separately and distinctly.
The sponsor's value amount remains confidential and is never shown to the public. Only the title and photo upload fields are required, while the URL, amount, and tagline fields are optional.
Managers
Users can have as many managers as they want. When adding a new manager, they can search for and select the manager, and then assign specific permissions.
The primary manager has unique capabilities that other managers do not, such as editing, creating, and managing other managers and this page. The owner has the same permissions as the primary manager.
Adding a New Manager:
To add a new manager, the user needs to click the “Add New Manager” option seen on the manager homepage.

Search and Add Manager: When a new window appears to search for the desired manager, the user can search and click on the “Add” button beside the name.

Assign Permissions:
Another window appears displaying a set of radio buttons. Each radio button corresponds to a specific benefit that can be granted to the manager. By toggling the radio buttons on or off, the user can customize which benefits the manager is allowed to have.
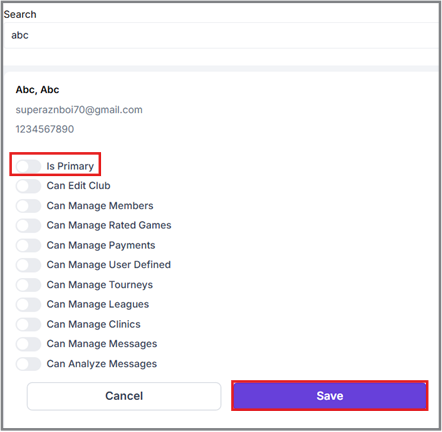
When the user makes a new manager primary, the previous primary manager will automatically lose their primary status. Only one manager can be primary at a time. The option to make any manager a 'Primary Manager' is also available in one of those radio buttons.
Changing the Primary Manager:
Under any circumstance, if the user wants to make a manager primary, they must:
- Click the “Edit” button next to the existing manager the user wants to make primary.
- Toggle on the "Is Primary" switch in the panel that opens on the right.
- Save Changes: Click the “Save” button below the radio buttons to confirm the change.
Members
The user can search for members by filtering through the organizations or by using the search bar.
Affiliation Distributions
On this page, the user can see multiple organizations with granted affiliations or pending affiliation requests.
This page also displays:
- The level of affiliations of the organizations
- Their active members
- The total balance they have regarding the affiliation
The user can also download all the affiliation details in various formats by clicking the Export button in the top right corner of the page.
By clicking the “Actions” option that is seen beside any organization’s name, the user will be able to see various more options:
Make Payment
1. Redirect to Payment Window- By clicking this option, the user will be redirected to another window to proceed with the payment.
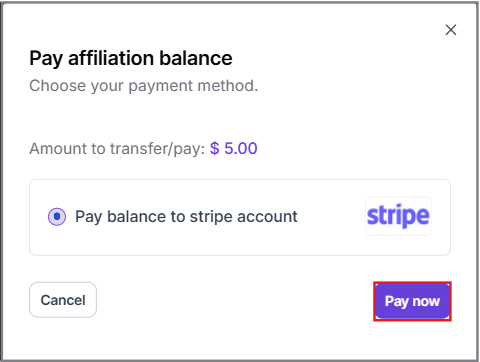
2. Stripe Payment Option- In this window, the system will prompt the user to make payments using their Stripe account. The user will proceed by clicking the “Pay Now” option.
3. Confirm Payment Details- Another window will pop up displaying the total amount to be paid. The user's saved card details will be visible, and they can select the card to use for the payment. The user can then proceed by clicking the “Pay Total Amount”.
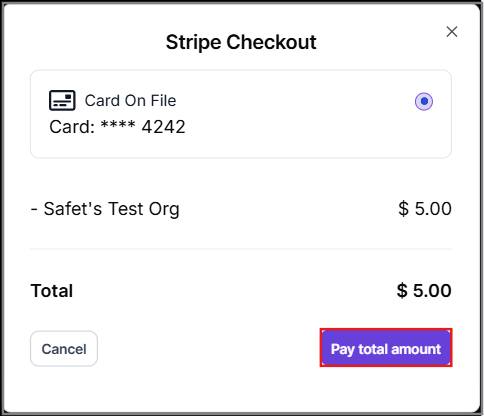
A notification will appear confirming that the payment was successful.
Transactions
Path- Affiliations>Transactions
Edit Affiliate
Clicking this option will redirect the user to edit the basic Information of the affiliated organization.
Path: Affiliate Levels>Edit Affiliate
Members
This option will redirect the user to the members section, providing all information regarding the members of the organization.
Path: Affiliate Levels>Members
Transactions
Coming Soon…